Search Results

Showing posts with label TCB. Show all posts

Sunday, March 10, 2013

Chocolate Genoise


Every now and then I crave chocolate cake. A couple of months ago when that happened, I made Devil's Food Cake with Midnight Ganache from Rose's Heavenly Cakes. I made them in cupcake format and they weren't very pretty so I didn't bother to take pictures and blog about it. I made too much Midnight Ganache so I froze the leftover, knowing they will come in handy at some point.

Wednesday, January 5, 2011

TCB: Bittersweet Cocoa Almond Genoise


For a New Year's party at a friend's house, I offered to make a cake. Which cake, I have no idea. It took me forever to choose. Do I choose one of the 40 cakes I have left from Rose's Heavenly Cakes? That would be good, one more cake down, 39 to go. Or do I try something from The Cake Bible?

The crowd I'm serving to seem to like Genoise-type cakes, and chocolate is always a favorite. I have made both Moist Chocolate Genoise and Genoise Au Chocolat. Genoise Au Chocolat is the running favorite (lighter, fluffy, and less sweet).

I flipped through RHC, looking at the ones I have not made. Then I did the same with TCB. My hand stopped at a page... the cake is called Bittersweet Cocoa Almond Genoise.

Score! I thought. This would work perfectly with a decorating idea that I had in mind, borrowing from this blog.

I read the genoise recipe. Intrigued. Then I did a search for this cake over at Rose's forum. It yielded results. Reading on, I'm liking the cake. And so here it is.

I made the full recipe of the cake, baked in 2 7 inch pans. It is not what Rose recommended, but I wanted to achieve a good height for the chocolate decor.

I used a low fat cocoa (Ghirardelli). I took Julie's suggestion and used 75% of the cocoa and 25% of Schaffenberger unsweetened chocolate. The combo worked like a charm and the cake turned out wonderful.


For the filling, at first I was going for stabilized whipped cream all over. On baking day I changed my mind and went for light whipped ganache. I didn't do a good job when melting the chocolate with the cream, the mixture was too hot and I can see the chocolate separating. Not a big issue, I took it off the heat and started adding cream slowly until the mixture come together.

Too lazy at this point to add more chocolate, I went with it and the result is a very very light ganache, more like a chocolate flavored whipped cream. It was wonderful. Fit perfectly with the cake as it was pretty rich.

Making this cake, I figured out that I much prefer piping than torting and frosting a cake. Slicing each cake in half is no biggie except the sides of the cake started falling a part and they look more like a distorted circle. I gathered all the crumbs, combined with some light ganache, and started spackling.

The chocolate decoration is pretty easy to do. I followed Emma's instruction down to a T. The only deviation I did was that I apply the chocolate directly onto a cake, instead of forming it around the tin can, as Emma did.

The chocolate was not even tempered, and it held up throughout the 60 photos I took and through the evening.

I'm very pleased with the end result, it didn't look like the mess that I torted.

And most importantly? My friends LOVED the cake. They all think it looks awesome and it tasted awesome.

Tuesday, November 16, 2010

TCB: Ethereal Pear Charlotte

This is a Special Edition Knitty Baker post, featuring The Ethereal Pear Charlotte from The Cake Bible. Why, you might ask, is it a special edition? Because, lovely readers, for once, I am going to post step-by-step pictures.

Before we get started, let me first say that I applaud you people out there who take step-by-step pictures. Man, it is time consuming to do this! Not only do I have to stop what I'm doing to take pictures, but also I had to wash my hand every single time. Maybe some of you don't necessarily wash your hands before you touch your camera. But my camera is 5 months old, it's my baby, and it's still pristine (I haven't even dropped it yet).


I thought you guys would like a peek of my messy work station. See on the corner the flours and cornstarch are sifted and thus ready to go.

Moving on to the actual posting, :). Here are the Red Bartlett pears. I am making 1/2 recipe so technically I only need 1 pear, but I like poached pears so I figured the more the merrier. We can always use extra poached pears for munching.


The pears are halved, peeled, and cored and are sitting (or laying) happily in their poaching liquid.


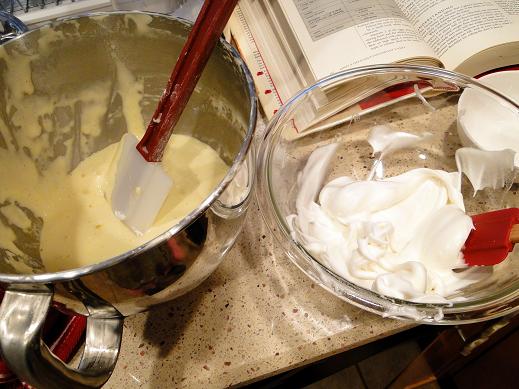
Next, I made the biscuit roulade. Here the yolks and eggs with sugar, ready to be whisked into submission.


My lovely red KA mixer in action!


Whisked eggs with sifted flour and cornstarch.


After the flour is folded, next up is egg whites.

The biscuit in the oven.


 The biscuit, measured and cut.
About 3 hours later, I took the stacked biscuit out from the freezer. 3 hours in the freezer is not enough to freeze the whole thing until solid - as prescribed by Rose - but at this point I was pressed for time.

The Charlotte mold ready for use.

And this is the part where the step-by-step picture ended. Why? Read on and you shall find out!

At this point I proceeded to make the custard for the Pear Bavarian Cream. I whisked the egg yolks, sugar, and gelatin together. Then whisked into it, the boiled poaching syrup from the pear. Next the whole thing is heated up until almost boiling and supposedly the mixture will thicken to be like heavy cream. Well, 10 minutes and counting, it is still liquid like mild. By the 15 minute mark, I gave up and strained it. And then I saw why it never thickened. I had a lot of egg yolks coagulation happening - so my whisking the poaching syrup into the egg yolks wasn't swift enough. SHIT (yes people I do curse sometimes. It takes a special event to have me curse, and this one totally qualifies!) At that time it was 5.30 PM, I still have loads to do in the kitchen and I do not want to start over!

While musing on what to do next, I whipped the cream and started on the Italian meringue - boiled the sugar syrup and whisked the egg whites.


And then an idea came to me. What if I added an extra yolk to the Bavarian cream, with some poaching syrup, and gelatin. It is risky, but technically it should work, and then at least I don't have to throw away all those egg yolks and it's not really starting over.

So dear readers, that's what I did. I took an egg yolk, 1 tsp of sugar, 2 tsp of poaching liquid. All these measurements are approximate. I didn't even bother to look at the recipe. In hindsight, that was pretty crazy and gutsy of me and I probably won't do it again. Anyway, I whisked the egg mixture real good. Heat up the liquid-y custard until hot then whisked it into the 1 egg yolk mixture. Next I heat everything up and in like 3 minutes, voila, the whole thing thickened like heavy cream. YAY!!! VICTORY!

And it was at this point that I realized I had forgotten to take pictures. Oops.. oh well, next time maybe :).

While the custard was cooling in the water bath, I did a victory dance around the kitchen area. And no, for those of you wondering, there is no picture or video of that one (and there will never be LOL).

The completed Bavarian cream, inside the Charlotte. To the fridge it went so the cream can set.


After 1/2 hour, it's time to slice the pears. The pears turned out a bit on a softer side, so it was a little hard to slice them evenly. This is when I was glad I had extra pears.

After two hours refrigeration, I un-molded the Charlotte for this photo shoot.


Tasting impressions:
Hmmmmm........... mmmmmmmmm.... mmhmmmm..... this is soooo goood! Again, my love for sponge cake is re-newed. I do like the Apple Caramel Charlotte better - because of the apples and the caramel-based Bavarian cream. But this one is really a close second. Now excuse me while I go have another piece.

Monday, October 11, 2010

TCB: Strawberry Maria


This is Strawberry Maria from The Cake Bible - sans the Chocolate Lattice Band. I decorated this ala Hector. The cake comprises of Genoise Au Chocolat and frosted with Strawberry Cloud Cream.


It was my 1st time making Genoise Au Chocolat - so I was a bit nervous. Genoise sometimes is a hit and miss for me. Remember this one? Well turns out I had good baking mojo on Saturday, as this genoise could not have turned out better.


The Strawberry Cloud Cream was pretty easy. I let the frozen strawberries thaw on the counter overnight. Then while the liquid is boiling, puree the strawberries, then combined both. The good thing with strawberries is that the seeds are so soft that you don't have to strain it out.

Decorating the cake is not as hard as I thought! Hector was right! Piping this was easier than piping small roses for the Golden Lemon Almond Cake a couple of weeks ago. My only issue was that the cloud cream is pretty soft, it was hard to get it to stay straight on the sides and my rose center looks like they want to just blend together!

Tasting impression:
This cake got rave reviews from my friends. People were taking 2nd and 3rds. Comments are "the cake is very light", "it's not too sweet", "the frosting taste like strawberry ice cream", "did you use real strawberries", "I'm going for another piece." I couldn't be happier!

Wednesday, July 14, 2010

TCB: Genoise Classique with Strawberry Mousseline

I made Genoise Classique last weekend - recipe from The Cake Bible. Initially, I split the recipe in half and baked in a 7 inch pan. The genoise turned out so beautifully - not disasterously as it was a couple of weeks ago - that I couldn't resist baking another half recipe.


I truly think there's something amiss in the beurre noisette that I made last time. I think I cooked it too long. As soon as I sacrificed the egg mixture into it, it started bubbling up, even though the beurre noisette was only a bit warm.

Well, no such thing happened this time. When I mix it with the egg, no bubbling or any strange reaction happened. They blend together like they are meant to be!


Mousseline is my favorite buttercream so far. I love the taste, it's so light I don't feel I'm eating a stick of butter. And I thought since I've made it several times, I got it down. This is what happened people, when you got comfortable and you thought nothing will go wrong. You get failed mousseline. It didn't turn out to be silky smooth but grainy.

I've never made mousseline in the summer, so I am blaming the hot weather. Somehow baking and hot weather doesn't work for me. Maybe I should just stick to cooking for now and taking pictures with the new camera LOL!

Though it's not a success, I tried to decorate the cake. I was grateful that the buttercream hold it's shape and it tasted good. The grainy-ness is not noticeable when we eat it, it just looks funny. We ate half the cake already. It is flavored with strawberry sauce recipe from The Cake Bible as well and boy oh boy, I can tell you the strawberry sauce is a killer!

Tuesday, February 16, 2010

TCB: Black Forrest Cake and Biscuit de Savoie

A couple of cakes I made recently outside the HCB bakers. Both from TCB.
Black Forrest Cake. I made 1/2 recipe of Moist Chocolate Genoise, split it in half. Syruped with the reduced canned cherry syrup with brandy. I baked the cake in a regular 9 inch pan. I placed the 1st layer inside a springfoam pan (without the bottom). Top with the Stabilized Whipped Cream, then poked in the halved cherry all around the insides, placed the 2nd layer on top, top again with whipped cream, then piped the swirls (I don’t know if they’re rosettes or what shapes they are LOL). Top with cherries and shaved chocolate.
A couple of changes to the recipe: the last time I made this cake (a couple of years ago), it was too alcoholic for me. Since I made this for a dinner party where I’m not sure people are used to hard liquor, I only use less than 1/2 the required brandy amount. Unfortunately, I think I reduce it too much because we ended up not tasting the alcohol at all. Funny enough, a couple of friend there said it’s too much alcohol - so I guess it’s a good decision.
Tasting impression: Aside from the lack of alcohol, the cake is really good. I find the whipped cream is too plain, probably also because there’s not much alcohol taste in the cake so the plain whipped cream flavor stands out more. For next time, if I use less alcohol in the syrup, I want to try adding liqour to the whipped cream or making the light whipped ganache variation (which sounds really yummy!).


Biscuit de Savoie. I mistakenly ordered two 9 x 1.5 inch Magic Line pan from Amazon (instead of 9 x 2 inch pan). Good thing is that these pan becomes the perfect excuse for Biscuit de Savoie. I’ve been wanting to try this one ever since I saw Hector’s amazing project. The recipe calls for three 9 x 1.5 inch layers but I only made 2 layers so I multiple the recipe by 2/3. The cake itself is very easy to make, no real suprises or crazy challenges. I syruped the cake with Chambord. The frosting is Raspberry Mousseline from TCB (with a couple of tablespoon of Chambord). I loved raspberries so I actually made the full recipe of the raspberry sauce so I can use some to drizzle on top of the cake. I also didn’t add too much sugar in the sauce so it taste pretty tart, which I love and it ended up going well with the sweet cake.
Tasting impression: There are no words to describe this cake. It is soooooo yummy. The Biscuit is so moist and tender and sweet. And mousseline is so heavenly! It kinda bothered me that the cake is so pink though. I think it’s super cute but everytime I eat it I think “hm.. it’s really pink.” I also find it hillarious that it bothered me, considering there’s no artificial flavoring and the pink color comes from the frozen raspberries.